Keeping insects out of your home is important for comfort and health. Flies, mosquitoes, and small bugs can disturb your sleep, spread germs, and make your home feel uncomfortable. Many people want a simple and affordable way to protect their windows without spending too much money.
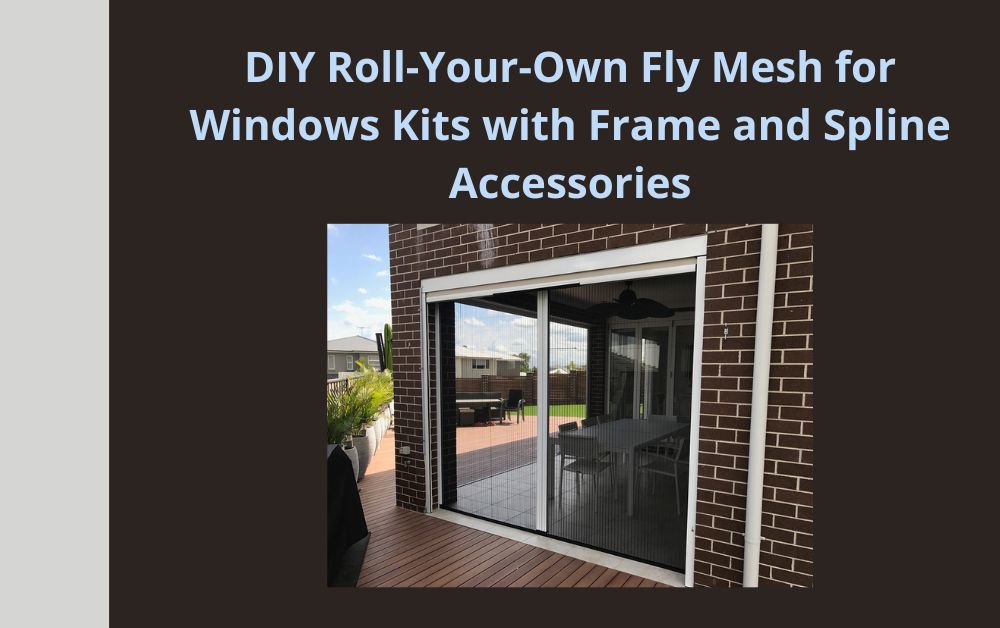
This is where DIY roll-your-own fly mesh for windows kits with frame and spline accessories become very useful. These kits allow you to install your own fly mesh easily. You do not need special skills. With simple tools and clear steps, you can create a strong and neat mesh screen for your windows.
In this blog, we will explain everything in simple English. You will learn what these kits are, how they work, what they include, and how you can install them at home.
What Is a DIY Roll-Your-Own Fly Mesh Kit?

A DIY fly mesh kit is a complete set of materials that helps you build your own window screen. Instead of buying a ready-made screen, you cut and assemble the frame and mesh yourself.
This gives you more control over the size and design.
Why “Roll-Your-Own” Is a Smart Idea
The word “roll” comes from the mesh being provided in a roll form. You cut the amount you need.
Custom Size for Any Window
Not all windows are the same size. With a roll, you can measure and cut exactly what fits your window.
Less Waste of Material
You only use what you need. This reduces waste and saves money.
Suitable for Small and Large Windows
Whether your window is small or wide, you can adjust the mesh and frame to fit perfectly.
What Comes Inside a Fly Mesh Kit?
A good quality kit usually includes everything required for installation.
Fly Mesh Roll
This is the main part. The mesh is usually made from fiberglass, polyester, or aluminum.
Fiberglass Mesh
Lightweight and flexible. Easy to cut and install.
Aluminum Mesh
Stronger and more durable. Good for long-term use.
Frame Sections
These are metal or PVC bars that form the border of your screen.
They hold the mesh tightly and keep the structure strong.
Spline Cord
The spline is a thin rubber or plastic cord.
It is pressed into the frame groove to hold the mesh firmly in place.
Spline Roller Tool
Some kits include a small tool used to push the spline into the frame.
This tool makes installation easier and smoother.
Corner Connectors
These small pieces join the frame bars together at the corners.
They help create a neat rectangular shape.
Benefits of Installing DIY Fly Mesh for Windows
There are many reasons why homeowners choose DIY fly mesh kits.
Cost-Effective Solution
Buying ready-made screens or hiring professionals can be expensive.
With a DIY kit, you save on labor costs and pay only for materials.
Easy to Install
You do not need advanced skills. Basic measuring and cutting are enough.
Fresh Air Without Insects
The mesh allows air and light to enter your home while blocking flies and mosquitoes.
Improved Comfort
You can keep windows open without worrying about insects coming inside.
Tools You May Need for Installation
Most kits include important accessories, but you may need a few basic tools.
Measuring Tape
Used to measure your window size accurately.
Hacksaw or Frame Cutter
Used to cut the frame bars to the required size.
Utility Knife or Scissors
Used to cut the mesh neatly.
Screwdriver (If Required)
Some windows may need small screws to secure the frame.
Step-by-Step Guide to Installing DIY Fly Mesh
Installing fly mesh may seem difficult at first, but it becomes easy if you follow simple steps.
Step 1: Measure Your Window Carefully
Measure the height and width of the window opening.
Measure Twice
Always double-check measurements before cutting.
Consider Frame Thickness
Make sure you allow space for the frame thickness.
Step 2: Cut the Frame Sections
Cut the frame bars according to your window size.
Ensure clean and straight cuts.
Step 3: Assemble the Frame
Use corner connectors to join the bars.
Make sure the frame is square and stable.
Step 4: Place the Mesh Over the Frame
Lay the mesh flat over the frame.
Leave a little extra mesh around the edges.
Step 5: Insert the Spline
Use the spline roller to press the mesh into the frame groove.
The spline will hold the mesh tightly.
Step 6: Trim Extra Mesh
Use a utility knife to carefully cut the extra mesh along the edges.
Now your fly mesh screen is ready to install.
Choosing the Right Mesh Material
Different homes have different needs. Choosing the right material is important.
Fiberglass Mesh for Everyday Use
It is affordable and easy to handle.
Best for normal weather conditions.
Aluminum Mesh for Extra Strength
Stronger and more durable.
Resists damage and lasts longer.
Pet-Resistant Mesh
Thicker and stronger.
Suitable for homes with cats or dogs.
Common Mistakes to Avoid During Installation
Avoiding small mistakes will help you get better results.
Incorrect Measurements
Wrong measurements can cause gaps.
Always measure carefully.
Loose Spline Installation
If the spline is not pressed firmly, the mesh may become loose.
Use steady pressure with the roller tool.
Cutting Too Much Mesh
Do not trim the mesh too early.
Trim only after the spline is secured.
Maintenance Tips for Long-Lasting Performance
DIY fly mesh screens require very little maintenance.
Regular Cleaning
Use a soft brush or cloth to remove dust.
Gentle Washing
Wash with mild soap and water if needed.
Avoid strong chemicals.
Check for Damage
Inspect the mesh and spline occasionally.
Replace damaged parts quickly.
Where DIY Fly Mesh Kits Can Be Used
These kits are not only for house windows.
Bedroom Windows
Ensure peaceful sleep without insects.
Kitchen Windows
Keep flies away from food areas.
Living Room Windows
Enjoy fresh air without worry.
Office Spaces
Create a comfortable working environment.
Advantages of Frame and Spline System
The frame and spline method is popular because it is strong and reliable.
Tight and Secure Fit
The spline locks the mesh firmly in place.
Easy Replacement
If the mesh gets damaged, you can remove the spline and replace only the mesh.
Clean and Professional Look
The frame gives a neat appearance to your window.
DIY vs Professional Installation
Many people wonder which option is better.
DIY Option
Lower cost
Flexible timing
Good for small projects
Professional Option
Saves time
Ideal for large or complex windows
For simple window sizes, DIY kits are usually enough.
Why More People Are Choosing DIY Fly Mesh Kits
Modern homeowners prefer simple and affordable solutions.
DIY kits offer flexibility and control.
You can install at your own pace.
You can also replace the mesh whenever needed without extra cost.
This makes it a practical solution for families who want long-term insect protection.
Tips for First-Time Installers
If you are installing for the first time, keep these tips in mind.
Work on a Flat Surface
Assemble the frame on a flat table or floor.
Take Your Time
Do not rush. Careful work gives better results.
Watch Tutorial Videos
Many simple videos are available online for guidance.
Safety and Health Benefits of Fly Mesh Screens
Fly mesh does more than just block insects.
Reduces Risk of Insect-Borne Diseases
Keeps mosquitoes outside.
Improves Air Circulation
Fresh air improves indoor comfort.
Less Need for Chemical Sprays
Reduces exposure to harmful chemicals.
Eco-Friendly and Smart Home Choice
DIY fly mesh kits are environmentally friendly.
They reduce the need for sprays and electric insect killers.
They also help in natural ventilation, which may reduce electricity use.
This makes them a smart choice for modern homes.
Final Thoughts on DIY Roll-Your-Own Fly Mesh for Windows Kits
DIY roll-your-own fly mesh for windows kits with frame and spline accessories are a practical and affordable solution for every home. They allow you to protect your family from flies and mosquitoes while keeping your windows open for fresh air.
The installation process is simple. The materials are durable. Maintenance is easy. You save money and enjoy long-term benefits.
Whether you live in an apartment, villa, or office space, installing fly mesh screens can improve comfort, hygiene, and safety.