
A flawlessly melted lace frontal gives an unmatched, natural look that can make you feel like a brand-new person. Whether you are rocking a dramatic side part, a sleek middle part, or a voluminous ponytail, a high-quality full lace frontal offers styling versatility that closures just cannot touch. But while installing frontal hair is an art form, removing it safely is a critical science.
Too often, the excitement of a fresh style turns into a nightmare during takedown. A rushed removal or using the wrong techniques can pull, rip, or chemically damage your delicate hairline, leading to the dreaded loss of your edges. Traction alopecia—hair loss caused by repeated pulling—is a very real risk when dealing with heavy-duty lace adhesives.
The good news? You do not have to sacrifice your natural hairline for the sake of a beautiful install. In this comprehensive guide, we will walk you through the exact step-by-step process to safely remove a full lace frontal, preserve your natural hair, and keep your edges thriving.
Closure vs Frontal: Why Frontal Removal Requires Extra Care
When deciding on a hairpiece, the debate often comes down to a closure vs frontal. While a closure typically covers a small, specific area (like a 4×4 or 5×5 inch patch at the crown), a full lace frontal stretches from ear to ear. This means a frontal covers your entire hairline, including the finest, most fragile hairs on your head—your edges.
Because a lace frontal spans a larger area, it requires a stronger bond to stay secure, especially around the ears where facial movements naturally pull at the lace. If you try to peel off a full lace frontal the way you might gently lift a small closure, you risk ripping out entire sections of hair. Understanding this difference is why patience and the right products are non-negotiable for frontal hair removal.
The Essential Tools You Need Before You Start
Before you even think about touching your hairline, you need to gather the right supplies. Never try to “dry peel” your lace or use random household soaps to break down professional-grade lace glue.
Here is what you should have on hand:
- A Dedicated Lace Release Agent: Look for alcohol-based solvents (like Walker Tape Ultra Hold Remover) or citrus-based oil removers (like Ghost Bond Ultimate Remover or C-22 Citrus Solvent).
- Natural Oils (Optional Backup): Pure jojoba, olive, or coconut oil can help break down less stubborn glues or skin-safe tapes.
- A Soft-Bristled Toothbrush or Silk Scarf: For gently working the remover into the lace.
- Rat-Tail Comb: Used exclusively for lifting the lace after the glue has completely dissolved, never for prying it open.
- Warm Water and a Mild Clarifying Shampoo: To clean both your skin and the lace afterward.

The Step-by-Step Guide to a Damage-Free Removal
Removing your full lace frontal should never be rushed. Set aside at least 30 to 45 minutes so you can take your time and let the products do the heavy lifting for you.
Step 1: Prep and Pull Back the Hair
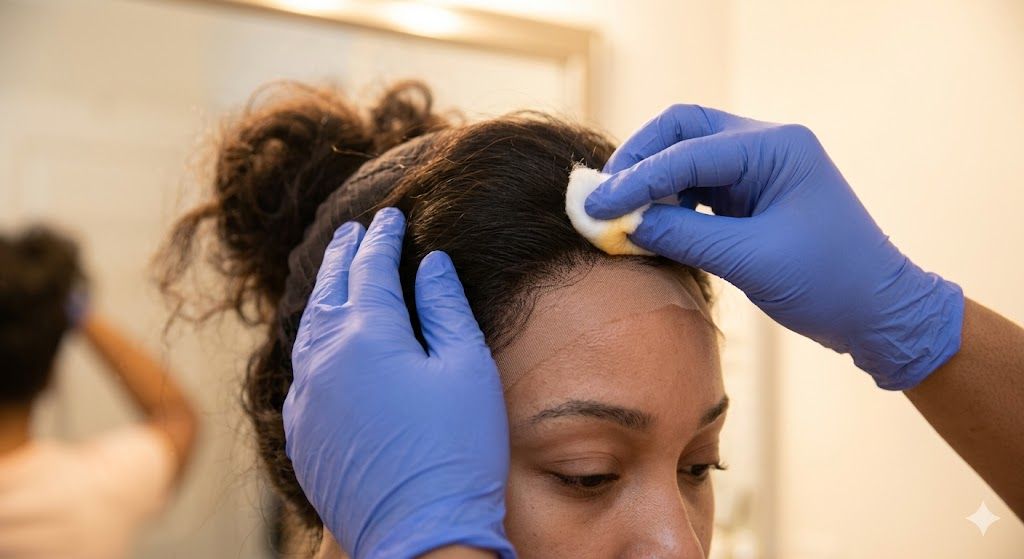
Tie the long hair of your frontal back into a secure ponytail or bun. You want full visual access to your hairline without loose strands getting caught in the adhesive remover or sticking to your face. If you have baby hairs laid, use a little warm water to gently brush them back away from the perimeter of the lace.
Step 2: Apply the Adhesive Remover Generously
Saturate the entire hairline where the full lace frontal is bonded to your skin. If you are using a spray solvent, shield your eyes and spray directly onto the lace perimeter. If you are using a liquid oil, use a cotton ball or swab to dapply it heavily along the edge.
Expert Tip: Do not skimp on product here. The lace needs to look visibly wet with the remover for the chemicals to effectively break the bond of the glue.
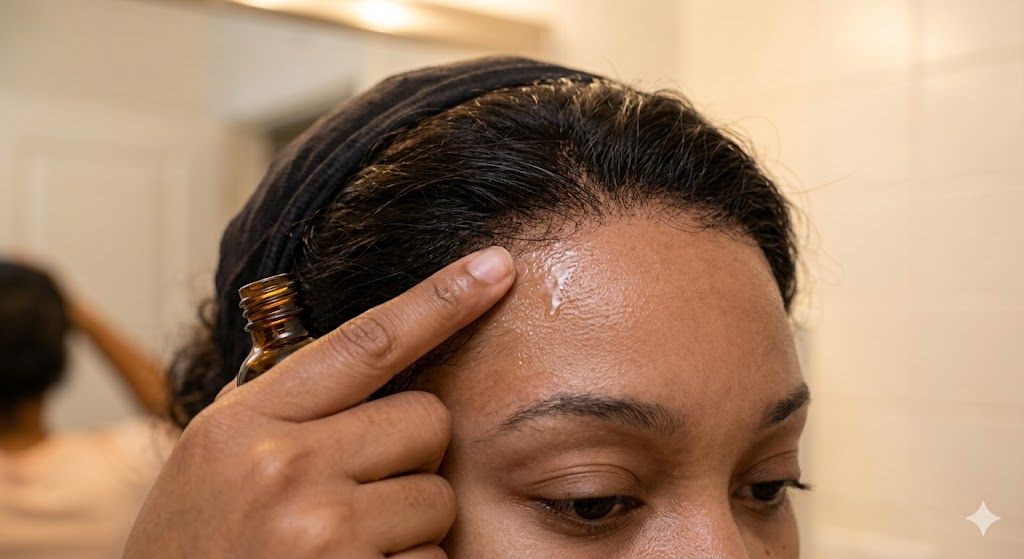
Step 3: Let it Sit (The Power of Patience)
This is the step most people skip, and it is exactly why damage happens. Once the remover is applied, wait 3 to 5 minutes. Let the citrus or alcohol break down the polymers in the adhesive. You will know it is working when you see the edges of the lace start to wrinkle, lift, or turn slightly white.
Step 4: Gently Massage and Lift
Using the pads of your fingers or a soft-bristled toothbrush, work the remover into the hairline using small, circular motions. Slowly work from one ear across to the other.
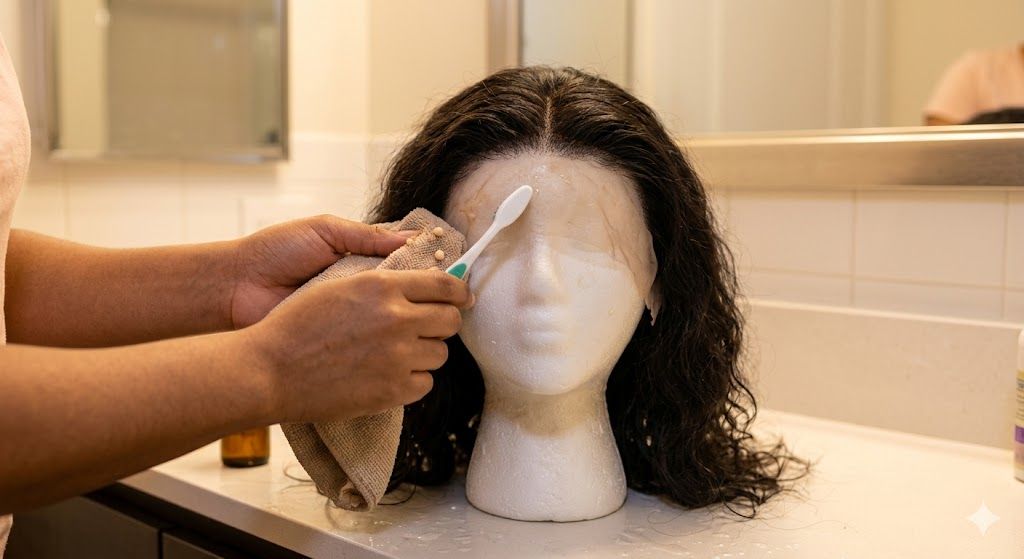
If the lace does not lift effortlessly, stop. Apply more remover and wait another two minutes. When the glue is fully dissolved, the lace frontal will literally slide away from your skin without you having to pull at all. Use the flat side of a rat-tail comb to slide underneath the loose lace to help separate it from any residual sticky patches.
Step 5: Cleanse Your Skin and Your Edges
Once the frontal hair is completely off, you will likely have a layer of sticky, gummy residue left on your skin and your natural hair. Do not scrape this off. Apply a bit more citrus remover or natural oil to your skin, let it sit, and then wipe it away cleanly with a damp microfiber cloth. Follow up with a gentle, sulfate-free clarifying shampoo to remove all oils and chemical traces from your hairline.
Pros & Cons of Common Removal Methods & FAQs
Pros & Cons of Removal Agents
|
Method |
Pros |
Cons |
|
Alcohol-Based Solvents |
Fast-acting; evaporates quickly; leaves less greasy residue on the lace. |
Can be drying to sensitive skin; strong chemical smell. |
|
Citrus/Oil-Based Removers |
Highly effective on heavy waterproof glues; gentle on skin and natural hair. |
Leaves a heavy oily residue; requires thorough washing to reinstall later. |
|
Natural Oils (Coconut/Olive) |
100% safe and moisturising; zero skin irritation; incredibly cheap. |
Takes a long time to break down professional glues; ineffective on heavy waterproof bonds. |
Frequently Asked Questions
Can I use rubbing alcohol (isopropyl alcohol) to remove my frontal?
While high-percentage isopropyl alcohol (91% or 99%) can break down some soft bonds, it is highly drying to your skin and hair follicles. If used repeatedly, it can cause skin peeling and make your natural hair brittle, leading to breakage along your edges. It is always better to use a formulated lace remover that contains skin-conditioning agents.
How often should I remove my full lace frontal to keep my edges healthy?
A professional lace frontal installation should generally not be left on for more than 4 to 6 weeks. Beyond this point, your natural hair begins to grow out, shifting the weight of the frontal and putting physical strain on your edges. Sweat, oil, and bacteria can also build up under the adhesive, causing skin irritation and weakening your hair roots.
What should I do if my edges feel sore or thin after removing the frontal?
Give your hair a break. Avoid installing another frontal or closure immediately. Focus on a low-tension protective style, and treat your hairline with soothing ingredients like aloe vera gel, castor oil, or peppermint oil to stimulate blood flow and support follicle recovery.
Conclusion: Prioritizing Hair Health Over Style
A full lace frontal is a fantastic asset for transforming your look, but the true test of a great install is the health of the hair underneath when it comes off. By choosing the right removal products, exercising patience, and never forcing the lace from your skin, you can protect your delicate hairline from damage.
Remember, hair trends come and go, but your natural edges are irreplaceable. Treat your hairline with the respect it deserves, and your hair will remain healthy, strong, and ready for your next flawless style.